
När det gäller val i Photoshop finns det verkligen två typer av människor - de som vet hur man använder pennaverktyget, och de som kämpar. De flesta sätter igång att lära sig att använda pennaverktyget så länge som möjligt, medan andra aldrig får lära sig det och tror att det är för förvirrande, för komplicerat och helt enkelt onaturligt.
I slutändan lider deras arbete i Photoshop för det, eftersom de fastnar och litar på Lasso-verktyget för nästan allt de inte kan välja med de rektangulära eller elliptiska markverktygen. I denna Adobe Photoshop-tutorial kommer vi att få slut på lidandet. Vi ska lära oss hur lätt det är att göra val med Pen Tool.
Nu, när jag säger "lätt", menar jag inte att du kommer att läsa den här handledning och omvandlas direkt till en Pen Master. Att lära sig använda pennaverktyget är ungefär som att lära sig att cykla. När du har lärt dig verkar det helt naturligt och du undrar hur någon kanske inte vet hur man använder något så enkelt. Men att komma till den punkten kräver lite övning och ansträngning, och när du läser varje bok finns det hur man ska cykla kan lära dig grunderna i hur pedalerna, växlarna och bromsarna fungerar, det är inte förrän du på cykeln kämpar för att hålla din balans att det verkliga lärandet börjar.
En av de fantastiska sakerna med Pen Tool är att det inte är något som är exklusivt för Photoshop. Långt ifrån! Praktiskt taget alla populära fotoredigerings-, grafik- och sidlayoutprogram använder Pen Tool i en eller annan form, så när du har lärt dig hur du använder den i Photoshop har du redan en god förståelse för hur du använder den i massor av andra program också!
Var hittar jag pennverktyget?
Innan vi börjar prata om vad Pen Tool är eller hur man använder det, bör vi titta på var vi hittar det i Photoshop först. Du hittar pennverktyget på verktygspaletten, grupperad i formverktygen, typverktyget och sökvägen (den vita pilen) och direktval (den svarta pilen) Verktyg (se bilden till vänster).
Photoshop's Pen Tool
Naturligtvis kan detta väcka frågan om varför, om vi kan göra val med pennverktyget, inte är det grupperade med de andra urvalsverktygen (det rektangulära markeringsverktyget, det Elliptiska markeringsverktyget, Lasso-verktyget, etc.) på toppen av verktygspaletten? Varför är det där nere med de andra verktygen som helt klart inte är urvalsverktyg?
Det är en utmärkt fråga, och det råder bara ett lika utmärkt svar att följa med det, som vi kommer att få till på ett ögonblick.
Varför kallas det "penna" -verktyget?
En av de första snubblorna för att lära sig använda pennaverktyget, som med många andra saker i Photoshop, är dess namn, eftersom det trots allt är en sak som alla som någonsin har försökt att använda den vet, den här saken är inte en penna. Åtminstone inte den typ av penna du normalt skulle tänka på när du hör ordet "penna". Försök att skriva ditt namn med det på samma sätt som du kan skriva på ditt namn på ett papper med en penna och du kommer antagligen att hamna med en vriden, trasslig röra och saker som slingrar över varandra (naturligtvis antar jag att kan mycket väl vara hur du signerar ditt namn).
 Pierre Bezier
Så om den inte fungerar som en traditionell bläckpenna, varför kallas den Pen Tool? Pennverktyget har faktiskt kallats flera saker under åren, och med det menar jag inte den typ av saker du kanske har kallat det i ögonblick av frustration. Du kanske har hört den kallas Bezier Pen eller Bezier Tool, och det beror på att det skapades av en man som heter Pierre Bezier (det är honom till vänster), en fransk ingenjör och en smart smart kille som kom med snygg matematik som driver verktyget när du arbetar för Renault bilföretag (Pen Tool skapades ursprungligen för att hjälpa till att designa bilar).
Du kanske också har hört Pen Tool som kallas Paths Tool, och det är verkligen det mest lämpliga namnet för det. Pennverktyget handlar om att rita "banor". För att göra val med pennverktyget konverterar vi helt enkelt sökvägen eller banorna vi har ritat till val. Men det börjar dock alltid med en väg.
Kortkoder, åtgärder och filter Plugin: Fel i kortkod (ads-basics-middle-2)
Vad är en väg?
En "väg" är, helt ärligt, något som kan verka lite på sin plats i ett program som Photoshop. Anledningen är att Photoshop främst är ett pixelbaserat program. Det tar miljoner små fyrkantiga pixlar som utgör en typisk digital bild och gör saker med dem. Sökvägar har å andra sidan absolut ingenting att göra med pixlar, varför jag sa att de kan tyckas på sin plats i ett program som huvudsakligen används för att redigera och rita pixlar.
En sökväg är egentligen inget annat än en linje som går från en punkt till en annan, en linje som är helt oberoende av och bryr sig ingenting om pixlarna under den. Linjen kan vara rak eller den kan vara böjd, men den går alltid från en punkt till en annan punkt, och som jag nämnde har det ingenting att göra med pixlarna i bilden. En sökväg är helt åtskild från själva bilden. I själva verket är en sökväg så separat att om du försökte skriva ut din bild med en sökväg synlig på skärmen skulle sökvägen inte visas på papperet. Om du sparat din bild som en JPEG.webp-fil och laddade upp den till en webbplats, även om du sparat bilden med sökvägen på din skärm i Photoshop, ser du den inte på bilden på webbplatsen. Sökvägar är endast för dina ögon och Photoshop. Ingen annan kommer någonsin att se dem, såvida de inte går förbi din dator medan du arbetar.
Vi behöver alltid minst två punkter för att skapa en väg, eftersom vi måste veta var banan startar och var den slutar. Om vi använder tillräckligt med punkter som vi kan ta tillbaka vår väg till samma punkt som det började från, kan vi skapa olika former ur banorna, vilket är exakt hur Photoshops olika formverktyg fungerar. Rektangelverktyget använder banor, anslutna med punkter, för att rita en rektangulär form. Ellipsverktyget använder banor, anslutna med punkter, för att rita en elliptisk form och så vidare. Det är också hur Photoshops typverktyg fungerar, även om Photoshop-handtag skriver lite annorlunda än det hanterar vanliga former, men all typ i Photoshop är i huvudsak tillverkad av banor. I själva verket kan du konvertera typ till former, som sedan ger dig alla samma redigeringsalternativ för sökvägar med typ som du får när du arbetar med former.
Du kanske också har hört banor som kallas konturer, och det är en ganska bra beskrivning av vad en sökväg är, eller åtminstone, vad en sökväg kan vara. Vi kan rita en fyrkantig bana, och om vi inte gör något annat med det, eftersom vi inte fyller den med en färg eller tillämpar ett slag på det, så är allt vi har en grundläggande kontur av en kvadrat. Samma med en cirkel eller annan form som vi ritar. Banan i sig är bara konturen av formen. Det är inte förrän vi gör något med sökvägen, som att fylla den, tillämpa en stroke eller konvertera den till ett urval, att vägen faktiskt blir något mer än en grundläggande kontur.
Du kan välja en hel sökväg med hjälp av sökvägsverktyget (även känt som "svart pil" -verktyget), eller du kan välja enskilda punkter eller sökvägsegment med Direct Selection Tool (verktyget "vit pil"). En sökväg "segment", eller "linjesegment" som det ibland kallas, är vilken väg som helst mellan två punkter. En rektangulär bana, till exempel, skulle bestå av fyra punkter (en i varje hörn), och de individuella vägarna som förbinder punkterna tillsammans längst upp, botten, vänster och höger för att skapa formen på rektangeln är vägsegmenten . Själva vägen i sig är kombinationen av alla de individuella vägsegmenten som utgör formen.
Det kan vara lite förvirrande, så låt oss se vad jag menar. Öppna ett nytt dokument i Photoshop. Det spelar ingen roll vilken storlek det är. Jag väljer storlek 640x480 från listan med förinställningar, men som sagt, det spelar ingen roll vilken storlek du väljer. Välj ditt pennaverktyg från verktygspaletten. Du kan också välja pennaverktyget helt enkelt genom att trycka på bokstaven P på tangentbordet.
De två pennverktygslägena
Innan vi fortsätter måste vi först se till att vi arbetar med banor, och det beror på att pennverktyget faktiskt har två olika lägen som det kan fungera i, och som standard använder det det andra. När pennaverktyget är valt kommer vi att se en grupp med tre ikoner om vi letar upp i alternativfältet högst upp på skärmen:

Alternativfältet i Photoshop visar gruppen med tre ikoner som representerar var och en av de tre pennaverktygslägena.
Jag vet att jag sa att det finns två lägen som Pen Tool kan fungera i och ändå, som för att göra saker mer förvirrande, finns det tre ikoner, men ikonen till höger, som är ikonen Fyll pixlar, är grå och inte tillgänglig när du arbetar med pennverktyget. Det är bara tillgängligt när du arbetar med olika formverktyg, så det finns egentligen bara två ikoner som vi behöver titta på.
Ikonen till vänster är ikonen Shape-lager, även känd som "inte den vi vill ha", och den är den som har valts som standard. Om vi skulle arbeta med pennaverktyget med den valda ikonen skulle vi rita former, precis som om vi använder något av de olika formverktygen, förutom att vi istället för att rita en fördefinierad form som en rektangel eller en ellips, kunde rita vilken form vi ville ha. Som jag sa, det är inte vad vi vill ha. Vi vill att ikonen bredvid den, Paths-ikonen, så fortsätt och klicka på den för att välja den:

Photoshop Tutorials: Klicka på "Paths" -ikonen i Alternativfältet för att arbeta med banor med Pen Tool.
Med pennverktyget markerat och sökvägsikonen vald i alternativfältet klickar du en gång var som helst i dokumentet. Klicka inte och dra, bara klicka. När du gör det lägger du till en liten fyrkantig punkt. Jag har förstorat det här:

Klicka en gång i dokumentet med pennverktyget för att lägga till en punkt.
Den första punkten som vi just har lagt till är utgångspunkten för vår väg. För tillfället har vi faktiskt inte en väg. Allt vi har är en utgångspunkt. "Punkten" kallas tekniskt ett ankare eller förankringspunkt, och det heter det för att det förankrar banan på plats. Den första punkten kommer att förankra början av sökvägen till denna plats inuti dokumentet. När vi lägger till fler poäng kommer var och en av dem att förankra vägen på plats på den platsen.
Låt oss lägga till en annan punkt. Klicka någon annanstans i dokumentet. Vart som helst kommer att göra. Jag kommer att klicka någonstans till höger om min första punkt:

Photoshop Tutorials: Lägg till en andra förankringspunkt genom att klicka någon annanstans i dokumentet.
Jag har nu lagt till en andra förankringspunkt och se vad som hände. Jag har nu en rak linje som går ihop med de två punkterna! Den raka linjen är min väg. Som jag nämnde tidigare behöver vi minst två punkter för att skapa en sökväg, eftersom vi måste veta var vägen startar och var den slutar, och nu när vi har både en start- och slutpunkt kan Photoshop ansluta till två punkter tillsammans och skapar vår väg.
Låt oss lägga till några fler poäng bara för skojs skull. Klicka ytterligare några gånger på olika platser i dokumentet. Återigen, klicka och dra inte, klicka bara:
Lägg till ytterligare poäng genom att klicka på olika platser i dokumentet.
I bilden ovan har jag lagt till ytterligare sju ankarpunkter genom att klicka på olika platser med Pen Tool, och varje gång jag lägger till en, ökade min sökvägs längd eftersom en ny "segment" -bana tillkom mellan den föregående punkten och den nya punkten. Min väg består nu av nio ankarpunkter och åtta vägsegment. Jag kunde fortsätta klicka runt i dokumentet för att lägga till fler förankringspunkter och sökvägsegment, men det jag verkligen skulle vilja göra nu är att stänga min väg så det bildar en fullständig form.
Stänger en sökväg
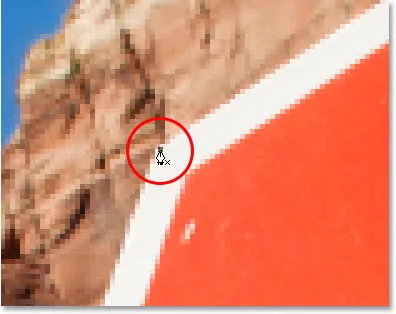
För att stänga en väg, behöver vi bara klicka en gång till på vår första startpunkt. När du håller muspekaren över startpunkten ser du en liten cirkel i det nedre högra hörnet av pennikonen:

En liten cirkel visas i det nedre högra hörnet av pennikonen när du håller markören över banans första startpunkt.
Den cirkeln berättar för oss att vi håller på att komma "full cirkel" med vår väg och avsluta den där den började. För att stänga det klickar du direkt på startpunkten.
Vi kan se nedan att min väg har blivit en stängd väg och nu är en grundläggande kontur av en form:
Vägen är nu stängd, slutar vid startpunkten och skapar en stängd väg.
Även om den här vägen ritades bara för skojs skull som ett exempel på hur man ritar en grundväg med Pen Tool kan jag enkelt förvandla den här vägen till ett urval. För det behöver vi Photoshop's Paths-palett, och vi tittar på det nästa.
Vända en väg till ett urval
Hittills har vi tittat på vad en väg är och hur man ritar en grundväg med Photoshop's Pen Tool. Men hur ska du göra ett urval från vägen?
Lätt! Det finns ett par sätt att förvandla en sökväg till ett urval, inklusive en praktisk kortkommando, men innan vi tittar på det snabba sättet, låt oss titta på det officiella sättet. Det "officiella sättet" innebär att du använder Photoshop's Paths-palett, som du hittar grupperade i med Layer-paletten och Channels-paletten:
Photoshop's Paths Palette.
Vid första anblicken ser Paths-paletten mycket lik Photoshops Layer-palett, och Adobe gjorde det avsiktligt så att du känner dig mer bekväm att använda den. Vi kan se en förhandsvisning av miniatyrbilden av formen på den sökväg som vi just skapade, och som standard namnger Photoshop sökvägen "Work Path", som i princip är ett fint sätt att säga "temporärt", som om du skulle skapa en annan sökväg nu utan att byta namn på denna sökväg till något annat först, skulle den här ersättas av den nya vägen. Du kan bara ha en "Work Path", så om du vill behålla den måste du dubbelklicka på dess namn i Paths-paletten och ge den något annat namn innan du skapar en ny sökväg.
Eftersom min sökväg ser lite ut som en krona kommer jag att dubbelklicka på namnet "Work Path", som med Photoshop: s Save Path-dialogruta, och jag kommer att byta namn på min sökväg "Crown":

Du kan spara en tillfällig "Work Path" helt enkelt genom att byta namn på den.
Jag klickar på OK när jag är klar, och nu om jag tittar i min Paths-palett igen, kan jag se det nog, min "Work Path" har bytt namn till "Crown":
Paths-paletten som visar att sökvägen har bytt namn till "Crown".
Genom att byta namn på den sparas sökvägen nu och försvinner inte på mig om jag går till en ny väg. Dessutom sparas alla sparade sökvägar med Photoshop-dokumentet, så nu, om jag sparar mitt dokument, sparas sökvägen med det och nästa gång jag öppnar dokumentet kommer banan fortfarande att finnas där i Paths-paletten.
Att spara en sökväg är inte något du behöver göra för att göra det till ett urval. I de flesta fall när du använder pennaverktyget för att göra val, kommer du inte att ha något behov av sökvägen när du har gjort ett urval av det, så det behöver inte sparas den. Om du vill spara det, ändra bara det till något annat än "Work Path" och det sparas.
För att förvandla sökvägen till ett urval, om vi tittar längst ner på Paths-paletten, kan vi se flera ikoner. Dessa ikoner tillåter oss att göra olika saker med vår väg. Den första ikonen till vänster är Fill-banan med förgrundsfärgsymbolen, och som namnet antyder kommer att klicka på den att fylla vår sökväg med vår nuvarande förgrundsfärg. Intressant, men det är inte vad vi vill ha. Den andra ikonen från vänster är Stroke-banan med penselikonen, som kommer att tillämpa en stroke på vår sökväg med hjälp av vilken pensel vi just nu har valt.
Detta är ett utmärkt sätt att skapa intressanta effekter i Photoshop, men för det vi gör här, omvandla en väg till ett urval, är det inte heller det vi vill ha. Den vi vill ha är den tredje ikonen från vänster, Lastvägen som en markeringsikon:
Ikonen "Ladda sökväg som markering" längst ner på Paths-paletten.
Så fort jag klickar på denna ikon blir min sökväg inuti mitt dokument ett urval, som om jag hade skapat den med hjälp av något av Photoshops vanligare markeringsverktyg:
Sökvägen har nu konverterats till ett urval.
Det är så enkelt! Det är faktiskt ännu enklare än så eftersom det finns en kortkommando för att förvandla en sökväg till ett urval utan att behöva byta till Paths-paletten alls. När du har ritat din sökväg och är redo att förvandla den till ett urval trycker du bara på Ctrl + Enter (Win) / Command + Return (Mac) för att få Photoshop att konvertera sökvägen till ett urval.
Vid det här laget kan det vara lite mer uppenbart för dig, även om Pen Tool är mycket ett urvalsverktyg, det är inte grupperat med de andra markeringsverktygen högst upp på verktygspaletten. Anledningen är att pennaverktyget främst är ett vägverktyg. Det skapar markeringar genom att först skapa banor, och av den anledningen har det mer gemensamt med de olika formverktygen och typverktyget, som alla använder sökvägar, än det har med de grundläggande markeringsverktygen som det rektangulära markeringsverktyget eller Lasso Verktyg som gör val bara baserat på pixlar.
Låt oss titta på ett praktiskt exempel på vad vi hittills har lärt oss. Här har vi ett foto av en stoppskylt framför några klippiga klippor:

Ett foto av ett stoppskylt.
Låt oss säga att jag ville välja det stoppskylt så att jag kan kopiera det till sitt eget lager. Stoppskylten består av bara en serie raka linjer, vilket kommer att göra detta extremt enkelt. Först behöver jag en startpunkt för min väg, så jag börjar i det övre vänstra hörnet av skylten genom att klicka en gång för att placera en initial förankringspunkt. I det här fallet spelar det ingen roll var jag startar vägen, men jag börjar i det övre vänstra hörnet:
Klicka en gång i det övre vänstra hörnet av stoppskylten för att börja vägen med en initial förankringspunkt.
Lägg märke till hur jag zooma in här när jag klickar. Du kommer att hitta det lättare när du gör val med Pen Tool för att zooma in lite på din bild. På så sätt kan du vara säker på att du håller din väg precis inom det område du vill välja.
Just nu har jag ingen väg, jag har bara en startpunkt för min väg. För att skapa sökvägen, allt jag behöver göra är att gå runt skylten och lägga till en förankringspunkt i varje hörn där vägen måste ändra riktning. När jag lägger till varje förankringspunkt kommer ett nytt banesegment att dyka upp och förena den tidigare förankringspunkten med den nya tills jag har gått hela skiltet. För att stänga sökvägen, klickar jag helt enkelt tillbaka på den ursprungliga utgångspunkten. Det är lite svårt att se på skärmdumpen nedan, men jag har nu en väg runt hela stoppskylt, inklusive inlägget som det är kopplat till, helt enkelt genom att gå runt klicka i hörnen där sökvägen måste ändra riktning:

En väg visas nu runt stoppskylten i bilden.
Om jag tittar i min Paths-palett nu, ser jag mycket tydligt att jag har en väg i form av stoppskylt:
Photoshop's Paths-palett som visar banan ritad runt stoppskylt.
Lägg märke till hur Photoshop har namngivit sökvägen "Work Path", vilket innebär att den här banan är tillfällig och jag tappar den om jag skapar en annan sökväg utan att spara den här först genom att byta namn på den. Även om jag inte skapar en ny sökväg kommer jag fortfarande att förlora den när jag stänger ur dokumentet såvida jag inte sparar det först. Jag behöver dock inte spara den här vägen, så jag oroar mig inte för det. I de flesta fall behöver du inte oroa dig för det heller.
För att konvertera min sökväg till ett urval klickar jag på Ladda sökvägen som en markeringsikon längst ner på lagpaletten, eller så kan jag lika enkelt trycka på Ctrl + Enter (Win) / Kommando + Retur (Mac):
Klicka på ikonen "Ladda sökväg som markering" i paletten Paths eller tryck på "Ctrl + Enter" (Win) / "Command + Delete" (Mac) för att konvertera sökvägen till ett urval.
Så snart jag gör omvandlas min sökväg till ett urval och stoppskylten är nu vald:

Stoppskylt väljs nu efter att konvertera sökvägen till ett urval.
Jag går tillbaka till min lagers palett och för att kopiera stoppskylt till sitt eget lager använder jag kortkommandot Ctrl + J (Win) / Command + J (Mac), som placerar skylten på egen hand skikt ovanför bakgrundsskiktet:
Stoppskylten har nu kopierats till sitt eget separata lager.
Med skylten nu på sitt eget lager kan jag göra vad jag vill med det, byta bakgrunden med en annan bild eller göra bakgrunden svartvit medan jag lämnar skylten i färg, vad jag kan tänka på. Poängen är att jag enkelt kunde välja skylten genom att klicka i hörnen med Pen Tool, vilket skapade en sökväg runt skylten och sedan konverterade jag helt enkelt sökvägen till ett urval.
Hittills i vår titt på att göra val med pennverktyget i Photoshop har vi lärt oss att pennan är ett urval av verktyg som Photoshops vanligaste markeringsverktyg som den rektangulära markören och Lasso-verktygen, men att istället för att göra val baserade på pixlar som de andra verktygen gör, ritar Pen Tool sökvägar som sedan enkelt kan konverteras till val, antingen från Paths-paletten eller genom att använda snabbtangentgenvägen.
Därför hittas pennan inte längst upp i verktygspaletten med de andra pixelbaserade markeringsverktygen utan är istället grupperade med sökverktygen, som de olika formverktygen, typverktyget och verktyget Val av sökvägar och direktval . Pennverktyget handlar om banor, inte pixlar.
Vi har lärt oss att vi kan lägga till förankringspunkter i vårt dokument, som förankrar banan på plats genom att helt enkelt klicka på olika platser med Pen Tool, och när vi lägger till fler och fler ankarpunkter, skapar vi en sökväg som varje ny punkt är ansluten till föregående punkt av ett nytt bansegment. Vi har också lärt oss att en sökväg är det som vanligtvis kallas ett "icke-utskriftselement", vilket betyder att oavsett hur många sökvägar vi lägger till kommer ingen av dem att synas på papperet när vi går ut för att skriva ut bilden . De kommer inte heller att vara synliga om vi visar bilden på en webbplats. Sökvägar är bara synliga för oss när du arbetar i Photoshop (även om andra program som Adobe Illustrator också stöder sökvägar). Det är inte förrän vi gör något med sökvägen, som att fylla den med en färg, tillämpa en streck på den eller konvertera den till ett urval, att banan blir något mer än bara en grundläggande, icke-tryckande kontur av en form.
Vi såg hur lätt det skulle vara att använda pennaverktyget för att välja något som ett stoppskylt genom att beskriva det med en sökväg som består av en serie raka vägsegment och sedan förvandla sökvägen till ett urval. Det är fantastiskt, men egentligen har vi inte gjort någonting ännu som vi inte kunde ha gjort lättare med något som Lasso Tool, eller ännu bättre, Polygonal Lasso Tool som byggdes specifikt för att välja plattsidiga former som vårt stopp tecken. Chansen är, om du inte har någon konstig fascination av vägskyltar, förr eller senare kommer du att vilja välja något lite mer intressant, och med "intressant" menar jag mer utmanande. Och med "utmanande" menar jag något som innehåller kurvor. Att välja ett krökt objekt i Photoshop är vanligtvis när du förlorar all respekt för de grundläggande markeringsverktygen. Lyckligtvis händer det också att pennaverktyget verkligen lyser!
Innan vi fortsätter ska jag påpeka att allt vi gjort till denna punkt har varit ganska enkelt. Klicka här, klicka där, konvertera sökvägen till ett urval, gjort. Den här nästa delen där vi får ritning av kurvor är inte riktigt lika enkel, även om det verkligen inte är svårt, men om det här är din första gång med Pen Tool eller om du inte har så mycket erfarenhet av det, kan arbeta med kurvor verkar vara lite onaturlig och till och med lite överväldigande. Det är definitivt där "ridning på cykel" -analogin kommer in. Du kan falla av några gånger till en början och undrar hur någon lyckas göra det, men ju mer du tränar och ju mer du håller dig med det, desto mer känsla är det börjar göra. På nolltid kommer det att se ut som en andra natur för dig och du kommer plötsligt att förstå varför så många människor svär att Pen Tool är det enskilt största valverktyget i hela Photoshop! Allvarligt är det verkligen.
Få ett handtag på riktningshandtag
Låt oss börja igen med pennverktyget. Öppna ett nytt tomt Photoshop-dokument, eller rader helt enkelt vad du hittills gjort i det befintliga dokumentet så att vi börjar färska. Sedan med pennaverktyget valt och alternativet Sökvägar valt i alternativfältet (kom ihåg att det är standardformat så att du måste se till att du har alternativet Vägar valt), klicka en gång var som helst i ditt dokument, precis som det gjorde vi tidigare. Den här gången, snarare än att bara klicka för att lägga till en ankarpunkt, klicka och dra sedan musen ett kort avstånd från ankarpunkten innan du släpper musknappen:
Klicka var som helst i dokumentet med pennverktyget och dra ett kort avstånd från ankarpunkten.
När du är klar ser du en ankarpunkt med två rader som sträcker sig utifrån. Vid första anblicken kanske du tror att vi på något sätt har lyckats dra ut en väg med Pen Tool. När allt kommer omkring ser det ut som att vi har tre förankringspunkter, en i vardera änden och en i mitten, med två vägsegment som förbinder dem. Om vi dock ser lite närmare, kan vi se att punkterna i vardera änden är lite mindre än den i mitten, och att de faktiskt har en annan form. Den i mitten är kvadratisk, och som vi har sett är en ankarpunkt kvadratisk, men de i båda ändarna verkar vara diamantformade. Är några förankringspunkter kvadratiska och några diamantformade?
Nej. Alla förankringspunkter är kvadratiska, och de är alla i samma storlek, vilket innebär att de mindre, diamantformade punkterna på ändarna inte är förankringspunkter. Och om de inte är förankringspunkter, betyder det att linjerna inte är vägsegment, eftersom vi behöver minst två förankringspunkter för att skapa en bana och just nu är den enda ankarpunkten vi har den i mitten. Så vad är de linjerna exakt som sträcker sig ut från förankringspunkten? Det är riktningshandtag!
"Ah, riktning hanterar!" du säger. "Nu fattar jag!"
… … …………….
"Vänta, nej, det gör jag inte. Vilket är riktningshandtagen?"
Riktningshandtag är, ja, handtag, och de används bara när du skapar böjda bansegment. Det finns inget behov av riktningshandtag när du skapar rakvägsegment. Det finns vanligtvis två av dem, även om det ibland bara finns en, och som vi redan har sett sträcker de sig från ankarpunkter. De kallas "handtag" för, som vi ser på ett ögonblick, kan du faktiskt ta tag i dem och flytta runt dem.
Riktningshandtag kontrollerar två saker. De styr kurvvinkeln och kontrollerar kurvans längd och gör det på ett riktigt snyggt sätt. Anledningen till att det vanligtvis finns två av dem är att en av dem styr vinkeln och längden på kurvan som kommer in i förankringspunkten, och den andra styr vinkeln och längden på kurvan som strömmar ut från förankringspunkten.
Innan vi tittar på hur vi drar kurvor med riktningshandtagen, låt oss först se hur vi kontrollerar själva handtagen, eftersom vår framgång med ritningskurvor beror mycket på vår förmåga att kontrollera handtagen. Oroa dig inte, det är inte som de säger raketvetenskap. Det finns bara några enkla saker du behöver lära dig. Vi har redan sett hur man skapar riktningshandtag genom att klicka med pennverktyget och sedan dra bort från förankringspunkten. Ju längre bort från förankringspunkten vi drar, desto längre blir riktningshandtagen. Ju längre handtag, desto längre kurva. Kort handtag, kort kurva. Långt handtag, lång kurva.
En av de trevliga sakerna du kommer att lära dig ganska snabbt om Pen Tool är att det är extremt förlåtande. Det finns ingen anledning alls att oroa sig för att få saker rätt första gången när vi drar vägar med det eftersom vi kan gå tillbaka och fixa saker lätt när vi är klara! Placerade du en förankringspunkt på fel plats? Inga problem! Flytta det bara dit du behöver det! Vi får se hur vi gör det på ett ögonblick. Drade du ut ett riktningshandtag i fel riktning? Inget problem. Ta tag i handtaget och vrid det i den riktning du behöver. Återigen ser vi hur du gör det. Är ett av dina riktningshandtag för långa eller för korta? Inga problem alls. Klicka bara på den och dra den längre eller kortare efter behov (japp, vi ska se hur vi gör det också). Vägar är fullt redigerbara hela tiden, så det finns absolut ingen anledning att oroa dig för att göra ett misstag eller att göra det rätt första gången. Gör det inte dig att känna dig lite bättre redan?
Rotera och ändra storlek på riktningshandtag
Som jag nämnde kallas de riktning "handtag" eftersom du kan ta dem som handtag och flytta runt dem. Låt oss se hur vi gör det. Först ska vi titta på hur du roterar båda handtagen samtidigt. Med hjälp av förankringspunkten och de två riktningshandtag som vi redan har skapat håller du ner Ctrl (Win) / Command (Mac) -tangenten. Du kommer att se din pennaverktygsikon tillfälligt förvandlas till ikonen för direktval (den vita pilen), och det beror på att med pennverktyget markerat blir "Ctrl / kommando" en snabb genväg för att tillfälligt få åtkomst till direktvalverktyget som är vad vi använder för att välja olika delar av vår väg. Klicka sedan direkt på den lilla diamantformen i slutet av någon av riktningshandtagen (klicka på "raden" i sig fungerar inte, så du måste alltid klicka på diamantformen i slutet av ett handtag för att göra någonting med den) och dra den runt förankringspunkten för att rotera den. När du roterar ett av handtagen, roterar det andra handtaget tillsammans med det i motsatt riktning, liksom en såg. Du kanske också märker att så snart du börjar dra handtaget kommer din musmarkörikon att ändras igen, den här gången till ikonen Flytta verktyg, eftersom vi flyttar något från en plats till en annan:
Håll "Ctrl" (Win) / "Command" (Mac) och klicka på slutet av något av riktningshandtagen och dra sedan i handtaget för att rotera det runt förankringspunkten. När du drar i ett handtag roterar det andra i motsatt riktning.
Du kan släppa din "Ctrl / Command" -nyckel när du har börjat dra handtaget. Du behöver inte hålla den nere hela tiden.
Om du vill ändra storlek på riktningshandtaget när du roterar det dra du helt enkelt änden på handtaget mot förankringspunkten för att göra det kortare eller dra det bort från förankringspunkten för att göra det längre. Som jag nämnde ovan kommer ett kortare handtag att göra kurvan kortare, och ett längre handtag kommer att göra kurvan längre. Du kan dock inte ändra storlek på båda handtagen på samma gång, så om du behöver ändra storlek på båda måste du dra var och en längre eller kortare separat. Det enda du kan göra för dem båda på samma gång är att rotera dem. Om du redan har släppt musknappen efter att ha roterat handtagen och markören har ändrats till ikonen Pen Tool och du måste ändra storlek på ett av handtagen måste du hålla ner "Ctrl / Command" igen för att tillfälligt växla tillbaka till Direct Selection Tool och klicka sedan och dra i slutet på handtaget för att ändra storlek på det:
Dra ändarna på handtagen in mot förankringspunkten för att förkorta dem, eller dra dem bort från förankringspunkten för att göra dem längre.
Låt oss nu titta på hur du roterar handtagen oberoende av varandra. To rotate one handle without affecting the other one, first release your mouse button if you've been rotating or resizing the handles so your cursor changes back into the Pen Tool icon. Then, instead of holding down "Ctrl/Command", which moves both handles at once, hold down your Alt (Win) / Option (Mac) key and click on the end of either of the direction handles. You'll see your cursor change into the Convert Point Tool icon, which looks like a simplified arrow made of only two lines, almost like an upside down letter "v" (except that it's not quite upside down). Then, simply drag the handle around the anchor point to rotate it, just as you did before, and this time, the handle will rotate independently of the other one, breaking the connection between them:
Hold down "Alt" (Win) / "Option" (Mac) and click on the end of either of the direction handles, then drag the handle to rotate it around the anchor point independently of the other handle.
Again, you can release your "Alt/Option" key after you've started dragging. You don't have to hold it down the whole time.
You can also resize direction handles using the "Alt/Option" key in exactly the same way as you can with the "Ctrl/Command" key. If you're in the process of rotating a handle, simply drag it in towards the anchor point to make it shorter or away from the anchor point to make it longer. If you've already released your mouse button and your cursor is showing the Pen Tool icon again, you'll need to hold down "Alt/Option" once again, then click on the end of the handle and drag it to resize it.
Is there a difference between resizing the handles using "Ctrl/Command" and using "Alt/Option" to do it? Yes there is. If you haven't yet "broken the connection" between the handles by dragging one independently of the other, resizing a handle using "Ctrl/Command" will keep the handles connected together. It won't resize both handles at once, but it won't break the connection between them either so you'll still be able to rotate them together if you need to. If you resize a handle using "Alt/Option", you'll break the connection between the handles. Even if you don't rotate the handle as you're resizing it, the connection will still be broken.
What if you've broken the connection between the handles by rotating them using "Alt/Option" and then want to rotate them together again? Can you "rebuild the connection", so-to-speak, by selecting one of them while holding down "Ctrl/Command" as before? Good question, and the answer is no. Once you've broken the connection between the handles, the "Ctrl/Command" key on its own won't bring it back. You'll need to select one of the handles while holding Ctrl+Alt (Win) / Command+Option (Mac) at that point in order to move the handles together again.
Quick Summary So Far …
We've covered a lot of information here about working with direction handles, so before we move on and start drawing some actual curves, let's do a quick recap:
- To add an anchor point, simply click with the Pen Tool.
- To add an anchor point with direction handles extending out from it, click with the Pen Tool, then drag away from the anchor point before releasing your mouse button. The further you drag, the longer the direction handles will be.
- To rotate the direction handles together, hold down Ctrl (Win) / Command (Mac), which will temporarily switch you to the Direct Selection Tool, then click on the end of either handle and drag it around the anchor point. The other handle will rotate in the opposite direction.
- To rotate the direction handles independently, hold down Alt (Win) / Option (Mac), which will temporarily switch you to the Convert Point Tool, then click on the end of either handle and drag it around the anchor point. The other handle will not rotate.
- To resize handles without breaking the connection between them, hold down Ctrl (Win) / Command (Mac) to switch to the Direct Selection Tool, then click on the end of either handle. Drag it towards the anchor point to make it shorter, or drag it away from the anchor point to make it longer.
- To resize handles and break the connection between them, hold down Alt (Win) / Option (Mac) to switch to the Convert Point Tool, then click on the end of either handle. Drag it towards the anchor point to make it shorter, or drag it away from the anchor point to make it longer.
- To rotate the direction handles together after breaking the connection, hold down Ctrl+Alt (Win) / Command+Option (Mac), then click on the end of either handle and drag it around the anchor point. The other handle will once again rotate with it.
Okay, that pretty much covers the basics of how to control the direction handles. Let's see how we can use them to draw some curves!
We've covered a lot of ground so far. We know about anchor points and direction handles. We know that in order to draw straight path segments, all we need to do is lay down a series of anchor points wherever we need them simply by clicking with the Pen Tool, and as we add more and more anchor points, we add more straight sections to our path. We know how to create direction handles and how to rotate them, either together or separately, and how to resize them.
We know how to turn a path into a selection by clicking on the "Load path as selection" icon at the bottom of the Paths palette or by simply pressing "Ctrl+Enter" (Win) / "Command+Return" (Mac) on the keyboard. One thing I didn't mention yet is that regardless of whether our path consists of straight lines,
curves, or a combination of straight lines and curves, converting it into a selection is done exactly the same way, and we've already learned how to do it, which means we're well on our way to mastering making selections with the pen! All we need to do is get a bit of practice drawing curves, which is exactly what we're about to do!
Bläddrar du fortfarande? Ladda ner denna handledning som PDF!
Drawing A Curve
Let's once again start fresh, either by opening up a new blank document in Photoshop or by deleting what you've already done. We're going to draw our first curve so we can put all of our newly-aquired direction handle knowledge to use. First, with the Pen Tool selected and the Paths option selected in the Options Bar, click once somewhere in your document to add an anchor point. Just click, don't click and drag. You should have one single anchor point on the screen when you're done.
Then, move your mouse cursor up and to the right of your initial anchor point. Click again to add a second anchor point, but this time, drag your mouse a little to the right of the anchor point to drag out direction handles. Hold down Shift as you drag to constrain your movement to a horizontal direction. As you drag out the direction handles, you'll see your path appearing as a curve between the two anchor points! The further you drag your mouse, the longer you make the direction handles, and the more of a curve you create:
Click once to add an anchor point, then click and drag out a second anchor point with direction handles, creating a curved path segment between the two points.
Click down and to the right of the second anchor point to add a third anchor point. This time, don't click and drag, just click:
Add a third anchor point down and to the right of the second one by clicking with the Pen Tool.
As soon as you add the third anchor point, a second path segment will appear, joining the second anchor point with the third one. And because our second anchor point has direction handles extending from it, this new path segment is also curved! We now have a nice, smooth arc starting from the first point on the left, then passing through the anchor point with the direction handles up top, and coming to an end at the third point.
One thing you may have noticed, and you can see it in the screenshot above, is that when you added the third anchor point, the direction handle extending out the left side of the second anchor point disappeared. It's still there, Photoshop simply hid it from view. To see it again, use the keyboard shortcut we've already learned to temporarily switch to the Direct Selection Tool, which is by holding down the Ctrl (Win) / Command (Mac) key, and then click on the second anchor point to select it. As soon as you do, the missing direction handle reappears as if it was there the whole time (which it was):

Hold down the "Ctrl" (Win) / "Command" (Mac) key to temporarily switch to the Direct Selection Tool, then click on the top anchor point to select it. The missing anchor point reappears.
With your "Ctrl/Command" key still held down so you still have access to the Direct Selection Tool, try resizing each direction handle by clicking on the end of each one to select it and then dragging it towards and away from its anchor point. Again, hold "Shift" as you drag to constrain your movement horizontally, and watch what happens. As you increase the length of a handle, you get more of a curve, and as you decrease its length, you get less of a curve. Also notice that each handle controls its own side of the curve. The handle on the left controls the curve coming into the anchor point from the left, and the handle on the right controls the curve flowing out from the anchor point on the right.
Here, I've made my handle on the left shorter, and as we can see, there's much less of a curve now than there was originally, almost becoming a straight line. I've also made the handle on the right longer, and as a result, the curve on the right is now much more pronounced. The faint curve is the original for comparison:
Change the shape of the curves by resizing the direction handles. The left handle controls the left curve, and the right handle controls the right curve.
I'm going to undo my changes by pressing Ctrl+Alt+Z (Win) / Command+Option+Z (Mac) a couple of times to set my direction handles back to their original sizes so they're equal length once again. Now let's try rotating the handles. Hold down "Ctrl/Command" once again to access the Direct Selection Tool, then click on the end of either handle to select it and try rotating it around the anchor point. Since we selected the handle with "Ctrl/Command", both handles rotate together. Here I've dragged my left handle down and to the right, and the angle of the curve on the left changed along with it, now appearing as more of a slope as it rises up towards the anchor point. By dragging the left handle down and to the right, I caused the right handle to rotate up and to the left, and again, the angle of the curve on the right changed along with it, now rising above the anchor point briefly before making a steep decent down to the anchor point on the right. Again, the faint curve is the original for comparison:
Rotate the direction handles to change the angle of the curves. Select a handle while holding "Ctrl" (Win) / "Command" (Mac) to rotate both handles together.
The Dreaded "Loop"
One thing you want to avoid is rotating the handles too far, which will cause your path segments to overlap and create loops. Here, I've rotated my handles all the way around so that the left handle is now on the right and the right handle is on the left, and notice what's happened. My path segments are now overlapping each other, creating a loop:
Rotating the direction handles too far causes the path segments to overlap, creating an unwanted loop in the path.
Loops can be caused by rotating the direction handles too far, as I've done above, but more often than not, they're caused by a handle being too long, making the curve too long and causing it to overlap with itself. If that happens, which it does sometimes as you're drawing a path, simply shorten the length of the direction handle. Most people end up creating a whole bunch of loops in their path when they first start working with the Pen Tool, so don't think you're the only one. No need to panic or become frustrated though. As I said, the problem is most likely being caused by a direction handle being too long, and all you need to do is shorten the handle to "un loop" the loop!
I'm going to press Ctrl+Alt+Z (Win) / Command+Option+Z (Mac) a few times once again to undo my changes and reset my path back to the nice smooth arc I started with. Now, what about rotating the direction handles independently of each other? As we learned on the previous page, to rotate the handles separately, instead of selecting them with "Ctrl/Command", we simply select them while holding down Alt (Win) / Option (Mac), which gives us temporary access to the Convert Point Tool. Click on the end of a handle to select it, then drag it with your mouse to rotate it and this time, the other handle will stay in place, breaking the connection between them.
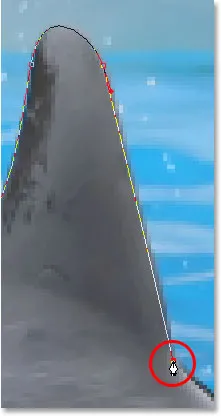
Here, I've selected the handle on the right while holding "Alt/Option" and then rotated it down and to the left. Notice how once again, the angle of the path segment on the right changes to match the new direction of the handle, and this time, the handle on the left, along with the path segment on the left, both stay in place. My path now looks a bit like a shark fin:
Hold down "Alt" (Win) / "Option" (Mac) to temporarily access the "Convert Point Tool", then click on the end of a direction handle to select it and rotate it independently of the other handle.
Moving An Anchor Point
One thing we haven't looked at yet is how to move an anchor point. If you recall, I mentioned on the previous page that the Pen Tool is extremely forgiving, and one of the reasons for it, besides being able to rotate and resize our direction handles after we've created them, is that we can easily move anchor points from one spot to another if we need to. As we've already learned, anchor points anchor a path into place. The anchor points themselves, however, are not anchored into place. You can move an anchor point anywhere, anytime, and any path segments that are connected to it will move and adjust right along with it.
To move an anchor point, hold down Ctrl (Win) / Command (Mac) to temporarily access the Direct Selection Tool as we've already been doing, then simply click on the anchor point to select it and drag it to its new location with your mouse. Any path segments connected to it will move with it to the new location. Here, I've dragged my middle anchor point down a bit from its original location (again, the faint path marks the original location for comparison). Notice how the path itself has changed shape to adjust to the new location of the anchor point:
Hold down "Ctrl" (Win) / "Command" (Mac) and click on an anchor point to select it, then drag it to a new location. Any path segments connected to the point will move with it, changing shape as needed.
Normally, when outlining an object with a path to select it using the Pen Tool, you won't need to move to an anchor point quite as far as what I've done above, but it's very common to go back around your path after you've created it and nudge a few anchor points here and there to fine-tune the path. Once you've selected an anchor point, you can nudge it up, down, left or right using the arrow keys on your keyboard.
Combining Straight Paths With Curves
What if I didn't want both of my path segments to be curves? What if what I needed was for the first path segment to be curved, but the second one needed to be straight? Let's see how to do that. I'm going to delete my existing path and start over again. First, I'll click to add an anchor point to start things off. Then, just as before, I'll click to add a second anchor point up and to the right of my initial point, and this time, I'll drag out direction handles, which will create a curved path connecting the two points, giving me exactly what I had way up at the start of this page:
Click once to add an anchor point, then click to add a second anchor point and drag out direction handles to create a curve.
I now have my initial curve, but I want my next path segment to be straight. If I was to simply click somewhere to add another anchor point right now, I would get another curve because I have that direction handle extending out from the right side of the last anchor point I added. What I need to do is get rid of that one direction handle. Without a direction handle controlling the angle and length of a curve, we get a straight line.
To remove the handle, leaving only the handle on the left of the anchor point, all I need to do is hold down Alt (Win) / Option (Mac), which will again temporarily switch me to the Convert Point Tool, and then I just click directly on the anchor point. When I do, the direction handle on the right disappears, leaving only the one on the left:
Hold down "Alt" (Win) / "Option" (Mac) and click directly on the anchor point to remove the direction handle on the right, leaving only the one on the left.
Now, with the direction handle gone, if I click to add a new anchor point, I get a straight path segment between the two points :
With the direction handle on the right now gone, clicking to add a new anchor point adds a straight path segment between the two points.
I now have a curved path segment on the left and a straight one on the right! What if I wanted the exact opposite? Suppose I needed to start with a straight path segment and then follow it with a curve? To do that, first I'll start by clicking to add an initial anchor point. Then, since I want a straight path segment, all I need to do is click somewhere else to add a second anchor point, and I automatically get a straight path connecting the two points:
Click with the Pen Tool to add an initial anchor point, then click again somewhere else to add a second anchor point and create a straight path segment between them.
I'm going to keep my mouse button held down after clicking to add my second anchor point because I want my next path segment to be curved, and we know that in order to create a curve, we need a direction handle. To add a handle extending out from the right of my anchor point, I'm going to hold down Alt (Win) / Option (Mac), and with my mouse button still down, I'm simply going to to drag to the right of the anchor point. As I do, a direction handle will drag out along with it:
Hold down "Alt" (Win) / "Option" (Mac) and drag out a direction handle on the right of the anchor point.
Notice that the direction handle extended only from the right of the anchor point, not from both sides, leaving my straight path segment on the left in place. And now that I have my direction handle on the right, all I need to do to create my curve is click to add a third point:
Click to add a third anchor point, which creates a curved path segment between the previous anchor point and the new one.
And there we go! I now have a straight path segment on the left, followed by a curved segment on the right. Of course, most paths you draw are going to consist of more than just three anchor points. Let's say I wanted to continue this path, moving in the same general direction towards the right, and I want my next path segment to be curved as well. Just as I did a moment ago, I would leave my mouse button held down after clicking to add my third point. I would hold down Alt (Win) / Option (Mac) and I would drag out another direction handle. So far, we've only been dragging handles out towards the right, but what you really want to do is drag your handles out in the general direction you want the curve to follow. I want to create a curve that goes up and to the right, so I'm going to drag out a small handle in that same general direction:
Drag out your direction handles in the general direction of the curve.
Dricks! A good practice to get into is to keep your direction handles small when first dragging them out, since you never really know how long or at what exact angle they need to be until the actual curve appears, and the curve doesn't appear until you've added both of its anchor points. Once you've added both points and the curve appears, you can easily go back and make any adjustments you need to the handles. You may even want to wait until you've drawn the entire path before worrying about adjusting the handles.
With my direction handle created, I'm going to click to add a fourth anchor point, and I'm going to drag out direction handles from it as well:
Adding a fourth anchor point along with direction handles extending from it.
I now have a third segment added to my path, this one being a curve. Notice that this curve actually has two direction handles controlling it, one extending from the right of my third anchor point and one extending from the left of my fourth point:

The third path segment now has two direction handles, one on either end, working together to control the curve.
The overall shape of this curve is now being controlled by the length and direction of both of these handles. Watch what happens to the curve when I move the handles. I'll drag the bottom handle down and to the right, and I'll drag the top handle up and to the left. I'll also drag both of these handles longer. The faint curve is the original for comparison:
Changing the direction and/or length of either handle changes the overall shape of the curve. After rotating and lengthening both handles, the curve now appears in an "S" shape.
The curve is now a bit "S" shaped, and that's because the bottom handle is controlling the angle and length of the curve as it flows out from the third anchor point, while the top handle is controlling the angle and length of the curve as it flows into the fourth point. Changing the length and/or direction of either handle will change the overall shape of the curve.
I'm going to press Ctrl+Alt+Z (Win) / Command+Option+Z (Mac) a couple of times to undo the changes I made, so the curve is once again in a simple arc shape as it was a moment ago, and I think I'll finish off this path with another straight segment, which means I'll need to remove that direction handle extending out from the right side of the fourth anchor point. We've already learned how to do that, by holding down Alt (Win) / Option (Mac) and clicking directly on the anchor point itself:
Hold down "Alt" (Win) / "Option" (Mac) and click directly on the anchor point to remove the direction handle on the right.
With the direction handle gone, all I need to do now to add a straight path segment is click to add another anchor point:
The direction handle on the right is now gone, so we can add a straight path segment simply by clicking to add another anchor point.
We could continue this path for as long as we wanted, adding more straight segments and curves, but I think we'll stop here because we've pretty much covered everything we need to know about drawing paths with the Pen Tool at this point. That was a lot of information to take in, especially if this is your first time learning about paths. As I mentioned at the beginning, you won't become a Pen Master simply by reading through this tutorial, just as you won't learn how to ride a bike, or drive a car, learn to swim, or play the piano simply by reading about it. But hopefully you have some sense at this point of how to draw paths with the Pen Tool, how to draw straight path segments, how to draw curves by dragging out direction handles, how to change the length and angle of the curve by rotating and resizing the handles, and how to combine straight and curved segments in a path.
To finish off our look at making selections with the Pen Tool, let's see a practical example of how to select an object with curves.
Here, we have a photo of a couple of dolphins leaping out of the water. Definitely a couple of very curvy creatures:

A photo of two dolphins jumping out of the water.
Let's say we want to select these dolphins so we can use them for a design or a collage, or whatever the case may be. If you were to try selecting them with the Lasso Tool, which is most likely what you would end up using if you didn't know how to use the Pen Tool, not only would you have a tough time, you'd have an even tougher time trying to convince yourself that you were happy with the results when you were done. The reason is because the Lasso Tool simply isn't capable of making curved selections very well. The biggest problem with it, besides being a pixel-based selection tool, is that it relies on you having a steady enough hand to move it smoothly around the curves. Even if you don't suffer from a caffeine addiction, you could drive yourself crazy trying to draw a perfectly smooth curve with your mouse, or even with a pen tablet, and when you've finally given up, you'll still be left with a selection full of rough, jagged edges that just scream "amateur!". No one likes to be called an amateur, especially when there's no need for it thanks to the Pen Tool!
Examine The Object First
Whenever you're about to select something with the Pen Tool, before you begin, take a moment to examine the object carefully to get a sense of where you're going to need to place your anchor points. Forget about all the details in the object and focus only on its shape. Where are the areas where the shape changes direction? Which parts of the shape are straight? Which parts are curved? If there's a curve, is it a smooth, continuous arc or does the angle change at a spot along the curve? Visualize in your mind where you're going to need to place your anchor points, because when you place one, you always want to be thinking about the next one and what the path segment between the two points needs to look like.
A Tool Of Elegance
One more thing to keep in mind is that the Pen Tool is meant to be a tool of elegance . It's not a nail gun or a staple gun. You don't want to just go clicking around your shape adding anchor points all "willy nilly" (that's a technical term). When using it to draw curves, you want those curves to be nice and smooth, otherwise we might as well just stick with the Lasso Tool. To keep the curves flowing smoothly, we need to limit the number of anchor points we use to create them. That's why you want to take a moment to examine the object first and visualize where the anchor points need to be. If you can outline a large section of the shape using only one curve with an anchor point on either end, that's what you want to do, because that's what's going to give you the kind of results you're looking for. The kind of results that scream "definitely not an amateur!".
Let's select these dolphins. I'm going to start my path in the middle of the photo, at the spot where the side of the dolphin on the left overlaps the rear flipper of the dolphin on the right. There's no right or wrong place to begin a path. This is just where I've decided to start. The first part of that rear flipper is straight, so since I don't need a direction handle to create a straight path segment, I'm simply going to click once with my Pen Tool to add my first anchor point, which will serve as the starting point for my path:
Adding the first anchor point.
As I mentioned earlier, you'll probably find it helpful to zoom in on your image as you're drawing your path. To scroll the image around on the screen as you're zoomed in, hold down the spacebar, which will switch you temporarily to the Hand Tool and allow you to move the image around on the screen by clicking and dragging it.
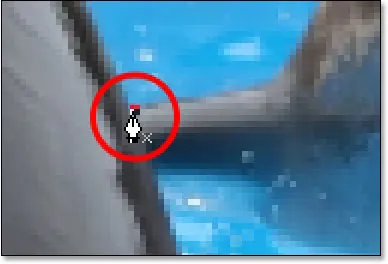
The top of that flipper actually has a slight curve to it as it approaches the dolphin's tail section, so for my second anchor point, I'm going to click at the point where the flipper and tail section meet, and I'm going to drag out short direction handles, dragging up and to the right in the direction that the tail section is moving. Notice that I've now created a slight curve along the flipper:
Adding the second anchor point and dragging out small direction handles to add a slight curve to the first path segment.
As I continue up along the tail, I can see that it stays straight for a short distance, followed by a curve to the right, so I'm going to click to add a third anchor point at the spot where the curve begins. This gives me a straight path segment between the previous point and the new one. I know there's a short direction handle extending out from the previous anchor point, which normally means that my new path segment will be a curve, not a straight section, but because the handle is so short and is also moving in the same direction as the path segment, there is no noticeable curve to it. Consider it a "mostly straight" path segment:
Clicking to add the third anchor point, creating a (mostly) straight path segment.
Continuing along, we come to the first real curve in our path. For this, I'm going to need to drag out a direction handle from the anchor point I just added, so I'm going to hold down Alt (Win) / Option (Mac), then drag out a handle in the general direction where I want the curve to flow as it starts. Notice how I'm only dragging out a handle from the one side of the anchor point, not both:
Hold "Alt" (Win) / "Option" (Mac) to drag out a direction handle from one side of an anchor point.
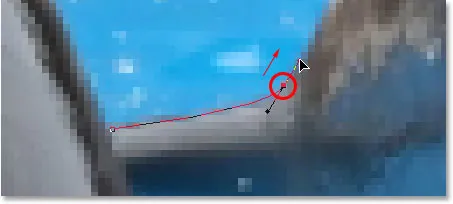
To add the curve, I'll click and drag at the spot where the curve ends, shaping the curve as I drag out the handles until it matches the curve of the dolphin's tail. If I needed to, I could also go back and change the length and direction of the handle at the start of the curve to fine-tune it, but in this case, I don't need to do that:
Adding an anchor point at the opposite end of the curve and dragging out direction handles from it, rotating and resizing them as needed until the curve matches the curve of the object.
The next area of the dolphin is pretty straight, right up until its back begins to merge with its dorsal fin, at which point there's another curve, so I'm going to click to add an anchor point just before the curve up the dorsal fin begins, which is going to give me another "mostly straight" path segment between the previous point and the new point. Then I'm going to once again hold down Alt (Win) / Option (Mac) and drag out a direction handle as I prepare for my next path segment which will be curved:
Click to add an anchor point, then hold down "Alt" (Win) / "Option" (Mac) and drag out a direction handle to prepare for the next path segment.
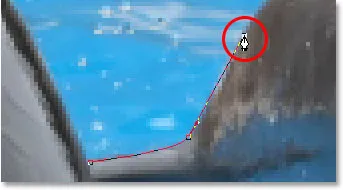
The left side of the dorsal fin consists mainly of one continuous curve upward until it gets near the very top, at which point the shape changes, so to create this curve, I'm going to click and drag at the point near the top where the curve will change direction. As we can see in the screenshot, this adds a curved path segment between the previous anchor point and the new one, but the curve is not yet following along the shape of the fin. It's going to need some fine-tuning:
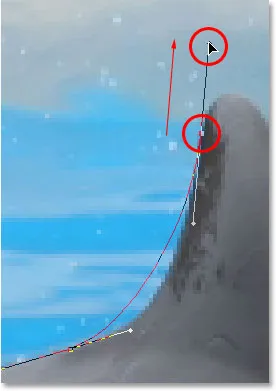
Adding a curve along the left side of the dorsal fin. The curve still needs some adjusting.
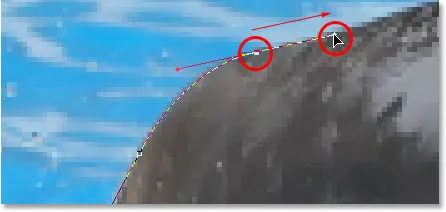
To adjust the curve, I'm simply going to hold down the Ctrl (Win) / Command (Mac) key, which gives me temporary access to the Direct Selection Tool, and I'm going to drag the handle extending out from the bottom anchor point towards the right to lengthen it, which is going to pull the angle of the curve in towards the right along with it, lining it up nicely with the curve of the fin. I've also rotated the top direction handles slightly in a clockwise direction just to be nit-picky, but the majority of the adjustment was done using the bottom direction handle:
Adjust the curve by adjusting its direction handles.
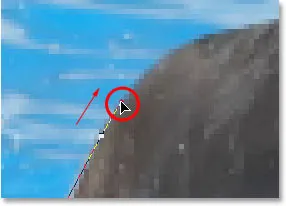
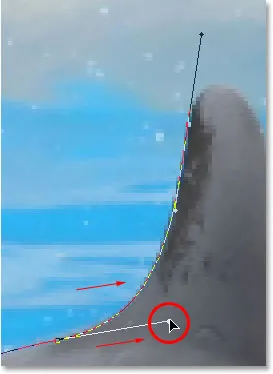
To add a curve around the top of the fin, I'll click and drag on the opposite side of it to add another anchor point with short direction handles. Notice though that we run into a bit of a problem. The direction handle on the left side of the curve is too long and it's pulling the curve away from the top of the fin:
The direction handle on the left of the curve is too long, resulting in the curve not following the shape of the fin.
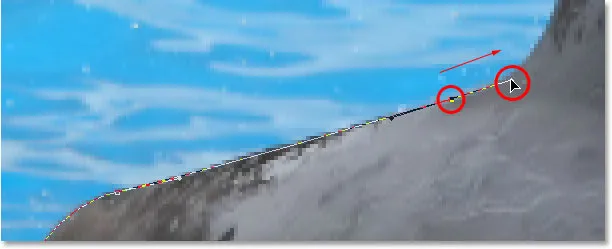
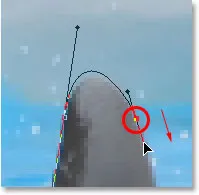
To fix that, all I need to do is once again hold down Ctrl (Win) / Command (Mac), then click on the end of the handle to select it and drag it shorter until the curve is the proper shape:
Shortening the length of the direction handle to adjust the shape of the curve.
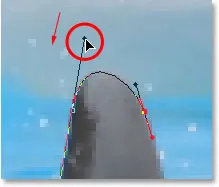
Let's finish creating our path around the dorsal fin. The remainder of the fin is basically a straight line, so I'm going to click at the base of the fin to add another anchor point which adds the straight path segment, completing our path around the fin:
Adding an anchor point at the base of the fin to finish drawing the path around it.
Since you and I would both be here all day if I was to continue commenting on every anchor point, direction handle and path segment as we make our way slowly around the dolphins, and since we've covered everything we need to know at this point, I'm going to go ahead and draw the rest of the path, outlining both dolphins:

Both dolphins are now outlined by the path.
The dolphins have now been outlined with the path, and if we look at the Paths palette, we can see that sure enough, we have a path in the shape of the dolphins:
Photoshop's Paths palette showing the outline of the dolphins in the preview thumbnail.
As we've learned, Photoshop automatically names the path "Work Path", which means it's temporary and will be replaced if we start a new path. If you wanted to save it, you would need to double-click on the name "Work Path" and rename it to something else, like "Dolphins" in this case. I'm not going to worry about that, since I have no need to save it. All I want to do at this point is convert my path into a selection, and since I'm already in the Paths palette, I'll do that by clicking on the Load path as selection icon at the bottom of the palette:
Clicking the "Load path as selection" icon at the bottom of the Paths palette.
I could also have used the keyboard shortcut Ctrl+Enter (Win) / Command+Return (Mac) . Either way converts my path into a selection, and if I look at my photo, I can see that my path has indeed become a selection around the dolphins:

The path around the dolphins has now been converted into a selection.
Vart ska jag gå …
Och där har vi det! The dolphins are now selected and ready for whatever plans we have for them. And with that, we wrap up our look at drawing paths and making selections with the Pen Tool in Photoshop! Mer information om Photoshopps urvalsverktyg finns i våra Hur man gör val i Photoshop-serien. Besök vårt Photoshop Basics-avsnitt för mer Photoshop-ämnen!